Title here
Summary here
June 30, 2014 in Systems12 minutes
I’ve mentioned before the need for networks to be addressed in a very programmatic way. Very often, I’ve found the discussion is actually a lot less about “programming language” details and more about getting rid of the methodology of addressing the network as a mere “collection of boxes” (see “Box Mentality”).
Instead, we have the ability to address the network as any developer would address the distributed components of an application. We acknowledge that networks are a distributed system - it’s what makes them as scalable as they have been. However, it’s important to understand we can address configuration and troubleshooting needs in a unified, automated way as well.
My goal in this post is to explore one particular application of such a methodology. I will use Ansible to first create a dataset that represents a spine/leaf network topology - also demonstrating how it might scale beyond my small lab implementation - then I will move into some kind of network task based on this information.
I have access to a few Cisco Nexus 9000 switches in the lab, and I wanted to be able to model a spine/leaf topology in a very elegant way that would (theoretically) scale as much as the fabric did. The idea is - once I have a dataset that represents the entire spine/leaf topology in some way, I can write functions that address the fabric as a whole. Produce a fabric/wide health check? Sure! How about troubleshooting routing, or a problem getting from port to port? Absolutely!
So, I went about it this way - I wanted to look at each spine as it’s own independent domain. Each leaf will be connected to each spine switch. Therefore, I wanted to use the spines as my starting point. I will address each spine one at a time, and build a topology from there. Each spine and it’s leaves will form what I’ll call a “spine domain”. In reality, our network may look like this:
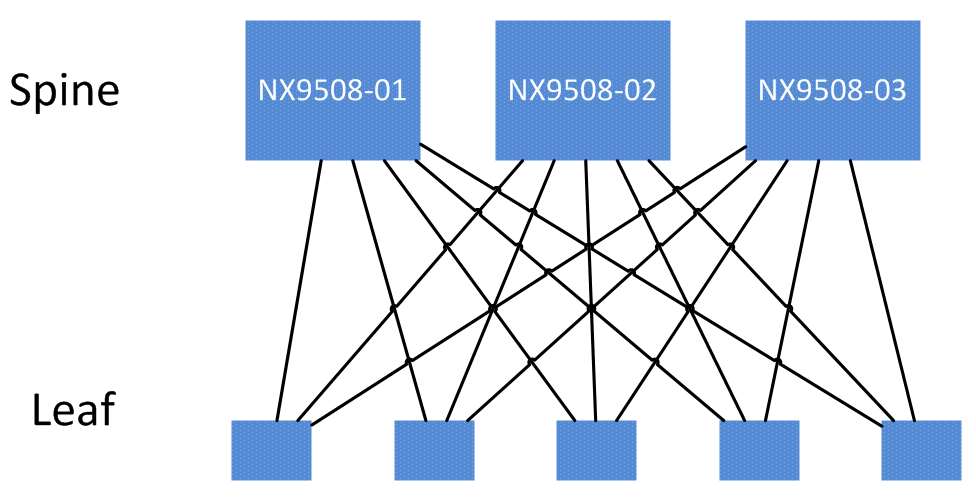
but programmatically, I want to store topology information so that each spine domain can be addressed independently from the others.
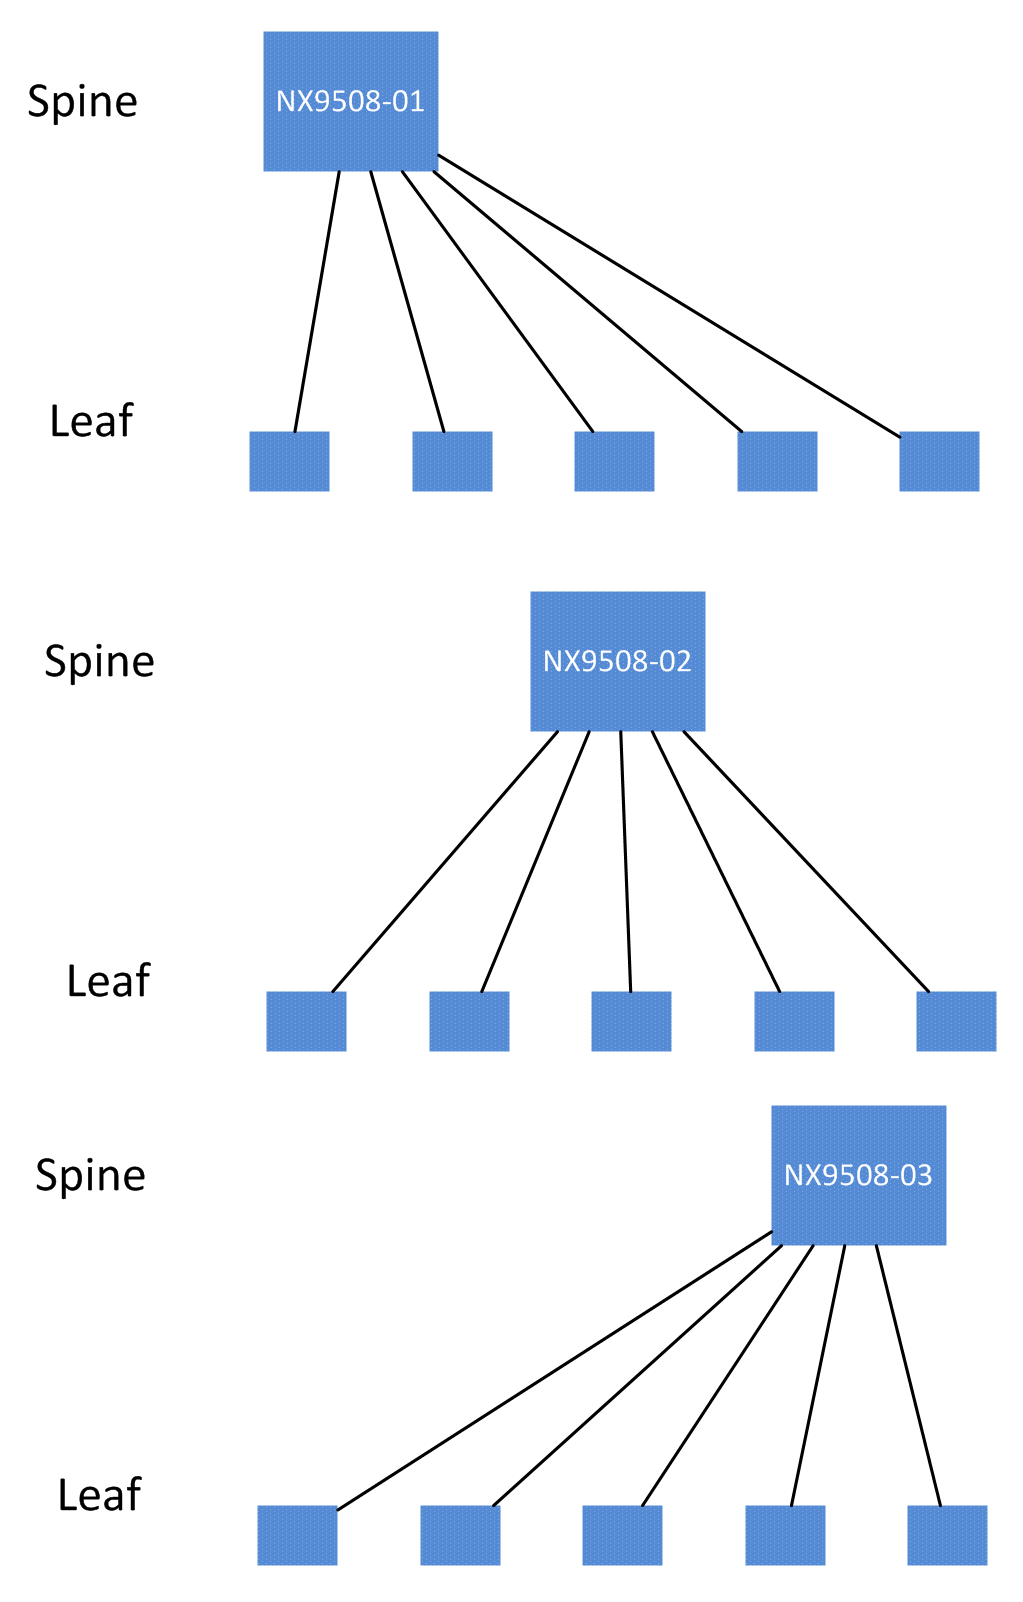
I am currently using the host ID (derived from “show license host-id”) to uniquely identify each spine and leaf in my topology table.
Make sense? In this way, I can perform configuration or verification tasks on only one “spine domain” at a time before moving on to the next. If I want to make a change within a spine domain, this layout helps prevent disruption of other spine domains.
Ready? Let’s get into it.
If you want to follow along at home, all the files you need are in my ansible-nxapi repository (hopefully soon Cisco will give us a Nexus 9K simulator as well :) ) This post also assumes basic familiarity with Ansible - check out this post for a good primer for using Ansible in the network world.
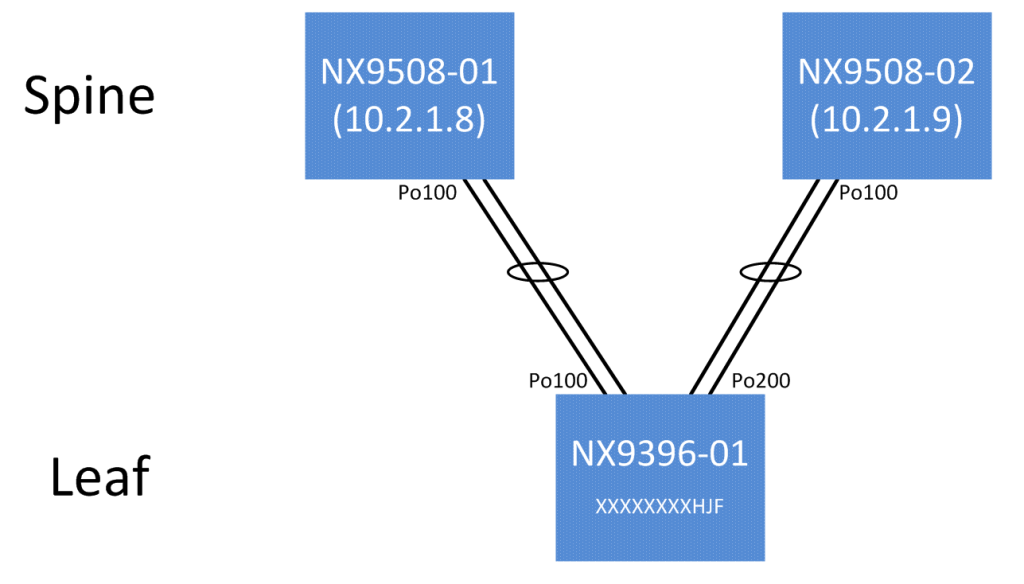
My actual topology is slightly less impressive - since it’s a lab environment, we only have a single leaf switch (Nexus 9396) connected to two spine switches (Nexus 9508). I’ll do my best to point out how our datasets can be expanded in the event we had more than one leaf or more than two spines. However, we do have two “spine domains”, which allows us to get an acceptable amount of topology information.
Im using a very simple topology, and my inventory file located at /etc/ansible/hosts will reflect that:
[spine]
10.2.1.8
10.2.1.9

[leaf]
192.168.1.123
The two spine switches are given their own group, because we want the topology to be stored for each spine node. My current implementation does not use the “leaf” group, but it’s there in case we want to use it later.
The module we care about for the moment is “nxapi_get_facts”. I wrote this module because the normal fact gathering process in Ansible doesn’t quite work as well for networking devices, and I only want some specific information for the time being. This module is actually designed to pull a lot more than topology information - by using a different key in the stored register, you could access hardware information, enabled protocols, etc. For now, we’ll focus on topology information.
Let’s write a simple play to retrieve this information and spit it onto the terminal in raw JSON:
---
- name: Build topology, verify OSPF
  hosts: spine
  connection: local
  gather_facts: no

  tasks:
    - name: Get Facts
      nxapi_get_facts:
          host={{ inventory_hostname }}
          user="admin"
          passwd="cisco"
          logfile="insieme.log"
      register: ins_facts

    - name: DEBUG TOPO
      debug: msg={{ item.value }}
      with_dict: ins_facts
As you can see, we’re using the Ansible “register” feature to store the data retrieved by the first task. I know that I’m returning a dictionary in the form of JSON for all of the fact information about these switches so I can iterate through all of the keys in this dictionary using the “with_dict’ function.
The second task will dump all information in ins_facts, so I’ll only post the key that is relevant to topology, namely “ins_facts.topo”. This module is designed to build a topology based off of entries found in the CDP neighbor table:
ok: [10.2.1.8] => (item={'value': {u'XXXXXXXXHJF': {u'local_if': u'Po100', u'mgmt_ipv4': u'192.168.1.123', u'remote_if': u'Po100'}}, 'key': u'topo'}) => {
    "item": {
        "key": "topo",
        "value": {
            "XXXXXXXXHJF": {
                "local_if": "Po100",
                "mgmt_ipv4": "192.168.1.123",
                "remote_if": "Po100"
            }
        }
    },
    "msg": "{uXXXXXXXXHJF:"
}
ok: [10.2.1.9] => (item={'value': {u'XXXXXXXXHJF': {u'local_if': u'Po100', u'mgmt_ipv4': u'192.168.1.123', u'remote_if': u'Po200'}}, 'key': u'topo'}) => {
    "item": {
        "key": "topo",
        "value": {
            "XXXXXXXXHJF": {
                "local_if": "Po100",
                "mgmt_ipv4": "192.168.1.123",
                "remote_if": "Po200"
            }
        }
    },
    "msg": "{uXXXXXXXXHJF:"
}
There are two main sections, denoted by the IP address of each switch (which was derived from the inventory file I showed earlier). What you’re looking at here is each of these spine switches reporting back all of it’s neighbors. Of course, each spine only has one neighbor - the single leaf switch, so we only see the one entry.
I am using the switch’s Host ID (from “show license host-id”) as a unique identifier for the remote switch, so if there were more than one leaf, each spine would report multiple items at the same level as the XXXXXXXXHJF item.
If you notice though, the “remote_if” value, representing the interface that the leaf is using to reach this particular spine, is different for each spine entry. This makes sense, of course, since the leaf will use different interfaces to connect to different spines.
As I mentioned, CDP is the source of this information, so let’s dig in a little bit. We’ll display the CDP neighbor table on the first spine switch:
NX9508-01# show cdp neighbors

Device-ID          Local Intrfce  Hldtme Capability  Platform      Port ID
NX9396-01(XXXXXXXXHJF)
                    Eth1/3/3       130    R S s     N9K-C9396PX   Eth1/2
NX9396-01(XXXXXXXXHJF)
                    Eth1/3/4       130    R S s     N9K-C9396PX   Eth1/1
Naturally, our CDP neighbor information isn’t learned on a port-channel interface, but rather on each individual physical interface. However, we’re likely going to be running some kind of routing protocol on our topology, and it would more than likely use Layer 3 port channels, meaning that we want this logical port channel interface to be the “connected interface” in our topology.
To that end I wrote in a small function within “nxapi_get_facts” that connects to the current spine switch, and checks if that interface is a member of a port channel. After the function runs, the remaining info will contain the physical interface if it is NOT a port channel member, and if it is a member of a port channel, it will return the logical port channel interface. It will also take note of the interfaces on the remote switch that are connected to this spine, and perform the same check by reaching out to the leaf and running the same bit of code.
At the end of the day, we get the JSON I posted above - a dictionary for each spine switch containing all of the leaves (just one in this case, but could be more), and both the local interface and remote interface. The IPv4 management address of the leaf is also retrieved, which will be useful for the port-channel check I mentioned above at the leaf level, as well as any other programmatic things we may need to do on the leaves.
This module is where most of my effort is currently going, since it will be the source of all truth for additional functionality.
Okay, now that we have a table of connectivity between all spines and their leaves, let’s do something useful. Inspired by Jason Edelman’s video on OSPF verification on routers using onePK, I decided to put my new dataset to use in a similar manner.
After the play written above to discover the topology, I’ll add a new play that uses my second module, “nxapi_ospf”:
- name: Verify OSPF Information
      action: nxapi_ospf
      args:
        host: "{{ inventory_hostname }}"
        user: "admin"
        passwd: "Cisco.com"
        logfile: "insieme.log"
        neighborInfo: "{{ item.value }}"
      register: ins_ospf
      with_dict: ins_facts.topo
This play uses the information stored in ins_facts.topo, which if you recall is where we stored the topology information from the first play.
My nxapi_ospf module is basically like an OSPF-specific “get facts” module, and it’s targeted specifically at links that sit between our spines and leaves. This allows us to see very quickly if there’s a mismatch on a required OSPF parameter. On a large-scale spine-leaf topology, this module could be used to verify that everything is operating as it should when a change is made - for instance, when a new leaf or spine is brought online.
As I mentioned before, I’m using the output of “show license host-id” as a unique key to differentiate between each connected leaf switch. In the OSPF table, the host ID of the local spine is also recorded (XXXXXXXX2Y7 in this example)
I wrote a quick debug following this play and re-ran the entire playbook. This will show all of the information now available in our “ins_ospf” register. I’ll just show the output for one of the spine-leaf relationships for brevity:
"item": {
    "key": "XXXXXXXXHJF",
    "value": {
        "local": {
            "details": {
                "addr": "1.1.1.5",
                "admin_status": "up",
                "area": "0.0.0.0",
                "area_nssa": "false",
                "area_stub": "false",
                "auth_type": "none",
                "dead_interval": "40",
                "hello_interval": "10",
                "ifname": "port-channel100",
                "masklen": "30",
                "nei_status": "DOWN",
                "nei_uptime": "none",
                "proto_status": "up"
            },
            "hostid": "XXXXXXXX2Y7"
        },
        "remote": {
            "details": {
                "addr": "1.1.1.6",
                "admin_status": "up",
                "area": "0.0.0.0",
                "area_nssa": "false",
                "area_stub": "false",
                "auth_type": "none",
                "dead_interval": "40",
                "hello_interval": "10",
                "ifname": "port-channel200",
                "masklen": "30",
                "nei_status": "DOWN",
                "nei_uptime": "none",
                "proto_status": "up"
            },
            "hostid": "XXXXXXXXHJF"
        }
    }
},
As you can see, there are two main sections here. One is given a key of “local”, and the other a key of “remote”. Underneath that is all the OSPF details on the link that connects to the other switch. Since we’re always running our modules against the spines, the “local” dictionary is information about the interface on the spine switch that connects to this leaf. The “remote” dictionary is the info that faces the opposite direction, coming from the leaf.
A cursory glance shows that all of the required parameters seem to match, but that’s no fun - let’s let Ansible tell us! Some strategic “when” and “debug” statements show us everything we need:
- name: Area check
  debug: msg="*** OSPF AREAS DO NOT MATCH ***"
  when:  item.ospf.XXXXXXXXHJF.local.details.area  !=  item.ospf.XXXXXXXXHJF.remote.details.area
  with_items: ins_ospf.results

- name: Hello Timer Check
  debug: msg="*** HELLO TIMERS DO NOT MATCH ***"
  when:  item.ospf.XXXXXXXXHJF.local.details.hello_interval  !=  item.ospf.XXXXXXXXHJF.remote.details.hello_interval
  with_items: ins_ospf.results

- name: Dead Timer Check
  debug: msg="*** DEAD TIMERS DO NOT MATCH ***"
  when:  item.ospf.XXXXXXXXHJF.local.details.dead_interval  !=  item.ospf.XXXXXXXXHJF.remote.details.dead_interval
  with_items: ins_ospf.results

- name: Stub Flag Check
  debug: msg="*** STUB FLAGS DO NOT MATCH ***"
  when:  item.ospf.XXXXXXXXHJF.local.details.area_stub  !=  item.ospf.XXXXXXXXHJF.remote.details.area_stub
  with_items: ins_ospf.results

- name: NSSA Flag Check
  debug: msg="*** NSSA FLAGS DO NOT MATCH ***"
  when:  item.ospf.XXXXXXXXHJF.local.details.area_nssa  !=  item.ospf.XXXXXXXXHJF.remote.details.area_nssa
  with_items: ins_ospf.results

- name: Auth Check
  debug: msg="*** AUTH METHODS DO NOT MATCH ***"
  when:  item.ospf.XXXXXXXXHJF.local.details.auth_type  !=  item.ospf.XXXXXXXXHJF.remote.details.auth_type
  with_items: ins_ospf.results
You may have noticed I’m statically referring to the leaf’s host ID in the debug tasks. This is a part of this library that is a work in progress - in the future, this will not be necessary.
Run this play now, and you get a bunch of “skip” messages, meaning none of the “when” statements above evaluated to true, which means that the OSPF parameters between the two switches match up:
TASK: [Area check] ************************************************************
skipping: [10.2.1.8] => ...
skipping: [10.2.1.9] => ...

TASK: [Hello Timer Check] *****************************************************
skipping: [10.2.1.8] => ...
skipping: [10.2.1.9] => ...

TASK: [Dead Timer Check] ******************************************************
skipping: [10.2.1.8] => ...
skipping: [10.2.1.9] => ...

TASK: [Stub Flag Check] *******************************************************
skipping: [10.2.1.8] => ...
skipping: [10.2.1.9] => ...

TASK: [NSSA Flag Check] *******************************************************
skipping: [10.2.1.8] => ...
skipping: [10.2.1.9] => ...

TASK: [Auth Check] ************************************************************
skipping: [10.2.1.8] => ...
skipping: [10.2.1.9] => ...

PLAY RECAP ********************************************************************
10.2.1.8                   : ok=11   changed=0    unreachable=0    failed=0
10.2.1.9                   : ok=11   changed=0    unreachable=0    failed=0
Let’s put it to the test - I’ll set the connecting interface on one of the spines to a different OSPF area, and re-run the playbook:
TASK: [Area check] ************************************************************
skipping: [10.2.1.9] => .....
ok: [10.2.1.8] =>  {
    "item": {
        "key": "XXXXXXXXHJF",
        "value": {
            "local": {
                "details": {
                    "addr": "1.1.1.1",
                    "admin_status": "up",
                    "area": "0.0.0.1",
                    "area_nssa": "false",
                    "area_stub": "true",
                    "auth_type": "none",
                    "dead_interval": "40",
                    "hello_interval": "10",
                    "ifname": "port-channel100",
                    "masklen": "30",
                    "nei_status": "DOWN",
                    "nei_uptime": "none",
                    "proto_status": "up"
                },
                "hostid": "XXXXXXXX2XX"
            },
            "remote": {
                "details": {
                    "addr": "1.1.1.2",
                    "admin_status": "up",
                    "area": "0.0.0.0",
                    "area_nssa": "false",
                    "area_stub": "false",
                    "auth_type": "none",
                    "dead_interval": "40",
                    "hello_interval": "10",
                    "ifname": "port-channel100",
                    "masklen": "30",
                    "nei_status": "DOWN",
                    "nei_uptime": "none",
                    "proto_status": "up"
                },
                "hostid": "XXXXXXXXHJF"
            }
        }
    },
    "msg": "*** OSPF AREAS DO NOT MATCH ***"
}
I only included the debug message for the area check, but you get where I’m going with this. It lets us know exactly which spine (10.2.1.8) and which leaf (contained within “remote”) has the problem, and on which interface.
As usual for complex demos like this, I went ahead and created a screencast so that you can see it all put together:
This is just one of a multitude of use cases I can think of with using a framework like Ansible against a spine-leaf topology. A flattened network architecture like this works really well with a tool like Ansible, so we can take advantage of all of the built-in functionality to get us these kind of checks.
This post focused mostly on the topology-gathering portion, but with this information, making actual changes to configuration is also quite possible. It wouldn’t be that difficult to write a play that provisioned a new leaf according to some standard template, then integrated it with the routing protocol safely.
Before all that, though, I wanted to focus on building the topology programmatically, in a way that represented the right methodology. Since I’m treating each “spine domain” separately, it would be a lot safer to make changes, since you can stop in between spine domains to verify the changes occurred in the right way.
I’ve been nerding out with feedback and control systems lately, and this methodology should prove useful for driving additional actions on network configuration if the topology details were to change. Do you have a use case for me to try out? Leave a comment below, or on Twitter!