Title here
Summary here
November 19, 2013 in Systems8 minutes
I recently had a need to deploy quite a few ESXi hosts on top of Cisco UCS B-Series blades (60+) back-ended by Netapp storage. I needed some kind of method to do this quickly so that I didn’t have to spend days just installing ESXi.
Here were some of the design guidelines:
Needed an ESXi 5.5 installation with the Cisco enic and fnic drivers installed, as well as the Cisco 1000v VEM module
Needed to install on a large number of hosts (50+)
Boot from SAN was a required component of the design, no local storage.
Because of the number of hosts, vSphere Auto Deploy was a no-brainer for me. However, this particular design required boot from SAN using the Netapp storage on the back-end, so a stateful configuration (introduced in vSphere 5.1) was needed. Auto Deploy would be removed later, so this was strictly a quick deployment mechanism.
I also had a few challenges to deal with
Provisioning of boot LUNs, LUN masking, and FC Switch Zoning would be incredibly tedious and prone to errors (120 WWPNs…not exactly a small task). Also needed to put into place a structure that allowed for flexible configuration when growth occurred.
Assigning IP addresses is also tedious - could be done with answer files and host profiles, but need to correlate with UCS Service Profile name.
So when you’re doing boot from SAN, there are a few things you need to worry about that you wouldn’t if you were running on local disk. The boot LUNs have to be provisioned in the first place, and all of a server’s WWPNs (2 for me) have to be given access to each LUN. You have to be careful not to give more than one server access to the same boot LUN otherwise you’ll really mess up the installation.
In addition, the FC switches need to have their zoning configuration updated so that each of the servers can access the storage.
So clearly, an automated approach is needed. I created a nice little snippet of PowerShell that will look at the service profiles in Cisco UCS (using the PowerTool module Cisco provided for PowerShell) and make sure that the boot lun and masking configuration in Netapp (using the Netapp PowerShell module) reflects that.
#We only want Service Profile Instances, not Templates
$serviceProfiles = Get-UcsServiceProfile -Type instance -Org $organization

#Iterate through Service Profiles, creating boot luns and igroups, mapping as you go
foreach ($SP in $serviceProfiles) {

    #create path to LUN
    $LUNPath = $NAbootVol + $SP.name + "_boot"

    #check to see if lun by this path already exists
    if (Get-NcLun -path  $LUNPath -Vserver $NAvserver) {
        Write-Host "LUN already exists: " $SP.Name
    } Else {
        New-NcLun -path  $LUNPath -Size 10g -OsType vmware -Unreserved -vserver $NAvserver
    }

    #Populate array with existing vHBAs on this service profile
    $vHBAs = $SP | Get-UcsVhba

    #check to see if igroup by this name already exists
    if (Get-NcIgroup -name $SP.Name) {
        Write-Host "igroup already exists: " $SP.Name

    } Else {
        #Create the igroup first
        Write-Host "Creating igroup named " + $SP.Name
        $newIgroup = New-NcIgroup -name $sp.Name -protocol fcp -portset $NAportset -type VMware -vserver $NAvserver

        #Iterate through each vHBA, and add each WWPN to this igroup
        foreach ($vHBA in $vHBAs) {
            Write-Host "Adding WWPN " $vHBA.Addr
            Add-NcIgroupInitiator -Initiator $vHBA.Addr -Name $SP.Name -vserver $NAvserver
        }

        #Adds the mapping at the tail end. Kept inside this if statement so it only ran on igroups that were created by this script, not existing ones
        Add-NcLunMap -Path $LUNPath -InitiatorGroup $newIgroup.Name -vserver $NAvserver
    }
}
I also wrote another snippet to produce a zoning configuration on a pair of Nexus 5596UP switches. It’s a little long (NX-OS still doesn’t have a legitimate API yet) so I won’t post it here. I’ll be integrating it into my Flexpod Toolkit though.
If you have an existing Cisco UCS configuration (which I also create via PowerShell) using Netapp storage, this is a handy script to true-up your boot LUN configuration, even if only a few LUNs are missing (great for testing).
Auto Deploy involves quite a few components and external prerequisites. I recommend you follow Duncan’s walkthrough if you’ve never done it - it’s what I first used back when I learned it in my own home lab.
As the walkthrough states, you first need to:
Set up a TFTP server to serve up the Auto Deploy files you can download from the Auto Deploy server. (tftpd works GREAT)
Set up a DHCP server with options 66 and 67 filled out to point to your own TFTP server (believe it or not tftpd can do this too, great in a pinch)
host profile
Create an image with the drivers I needed
Set up a deployment rule
Ensure the boot order for the servers was correct
My host profile was designed JUST to enable stateful installations. Everything else was configured via PowerCLI so this was all I needed it to do.
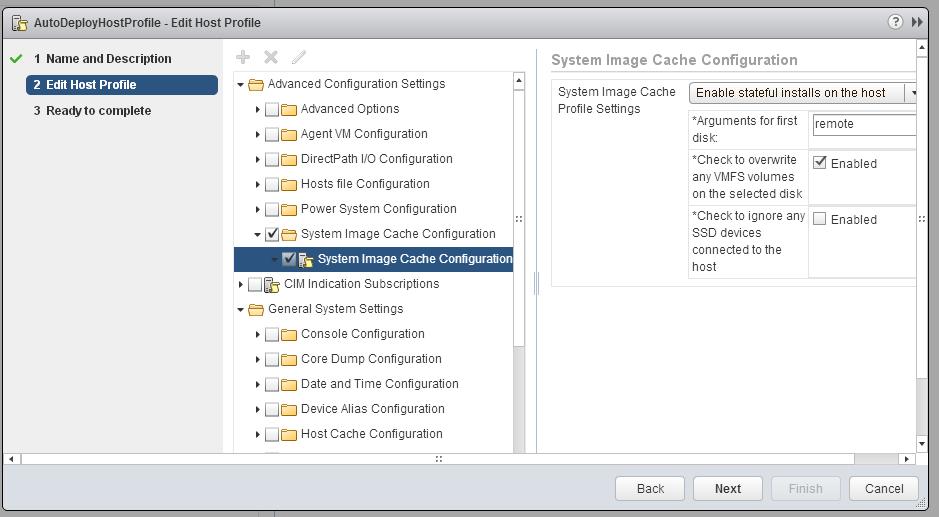
Note that the “arguments for first disk” field contains the word “remote”. This is key if you want to install to a SAN LUN - the documentation doesn’t mention this keyword.
WARNING - I used quite a few means to ensure that only each host’s boot LUNs were available at the time they started up. It is really easy to overwrite an important LUN with the above settings if you’re not careful. Make sure you’re aware of how you have things configured.
To create the image I needed, I ran this snippet of PowerCLI:
$imageProfileName = "ESXi55-1331820-CISCO"
$hostProfileName = "AutoDeployHostProfile"
$hostClusterName = "DCA-HA"

# Add main VMWare software depot
Add-EsxSoftwareDepot https://hostupdate.vmware.com/software/VUM/PRODUCTION/main/vmw-depot-index.xml

# Also add new drivers for Cisco stuff, etc. Either cd to the directory or add absolute path
Add-EsxSoftwareDepot fnic_driver_1.5.0.45-offline_bundle-1349670.zip
Add-EsxSoftwareDepot enic-2.1.2.38-offline_bundle-1349680.zip
Add-EsxSoftwareDepot VEM550-201309162104-BG-release.zip

New-EsxImageProfile -cloneprofile ESXi-5.5.0-1331820-standard -name $imageProfileName -Vendor "Cisco"

# Add drivers into Image Profile
Add-ESXSoftwarePackage -ImageProfile $imageProfileName *fnic
Add-ESXSoftwarePackage -ImageProfile $imageProfileName net-enic
Add-ESXSoftwarePackage -ImageProfile $imageProfileName cisco-vem*

New-DeployRule -Name "AutoDeployStateful55" -Item $imageProfileName, $hostClusterName, $hostProfileName -AllHosts

Add-DeployRule -DeployRule AutoDeployStateful55
Again, it’s important to remember that I didn’t provide any filter on oemstring, so any server that had access to the DHCP-enabled VLAN, upon reboot, would receive AutoDeploy treatment. This was a controlled environment where I knew the scope of this change. Be careful not to bork your servers. :)
This snippet of PowerShell (which requires Cisco’s PowerTool module) will do a good job of cycling through the exact service profiles that we want, and power them on. Be care with this, it’s easy to shut down basically every blade with a few changes to the code. However, as it stands, it will cycle through our Service Profiles, and power them on, all with a nice wait timer (5 min) for each run:
$SPS = Get-UcsServiceProfile -Type instance -SrcTemplName SPT-ESXi
foreach ($SP in $SPS) {
    $SP | Set-UcsServerPower -State admin-up -Force
    Write-Host "Powered up " $SP.name
    Start-Sleep -s 300
}
As you know, DHCP is required when running Auto Deploy, but I want my hosts to be statically addressed. So, I used a simple strategy - I created my DHCP scope in such a way so that if I rebooted hosts in the right order, and timed it so that each host got a sequential address, they’d all end up with the addresses I wanted them to have - it would just have happened via DHCP.
At this point I could go back in with a script, and simply re-use the same address, but make it static instead. There are other ways to get this done, but this was relatively simple and reliable. This snippet of PowerCLI will get into each host, and make the address change. With a simple tweak you could also do this through vCenter, assuming the hosts have been added to vCenter.
{%highlight powershell>}} for ($i=1; $i -le 60; $i++) { Write-Host “Connecting to $i” Connect-VIServer 10.102.40.$i -User “root” -Password "" -Force Get-VMHostNetwork | Set-VMHostNetwork -VMKernelGateway 10.102.40.1 Get-VMHostNetworkAdapter -Name “vmk0” | Set-VMHostNetworkAdapter -dhcp:$false -ip 10.102.40.$i -Subnetmask 255.255.255.0 -Confirm:$false Disconnect-VIServer 10.102.40.$i -Confirm:$false }
It's a good idea to set up your DNS correctly (with both A and PTR records) ahead of time - they'll show up in the vCenter inventory right away with their FQDN, not IP address.

Here's a short snippet that allows you to quickly add DNS names to a zone of your choosing (you can easily modify this to derive hostnames directly from Cisco UCS service profile names)

{%highlight powershell>}}
for ($i=1; $i -le 60; $i++) {
    $iPlus20 = $i + 20
    Add-DnsServerResourceRecordA -Name ESXi-$i -ZoneName example.com -IPv4Address "10.102.40.$iPlus20"
    Add-DnsServerResourceRecordPtr -Name "$iPlus20" -ZoneName "40.102.10.in-addr.arpa" -PtrDomainName "ESXi-$i.example.com"
}
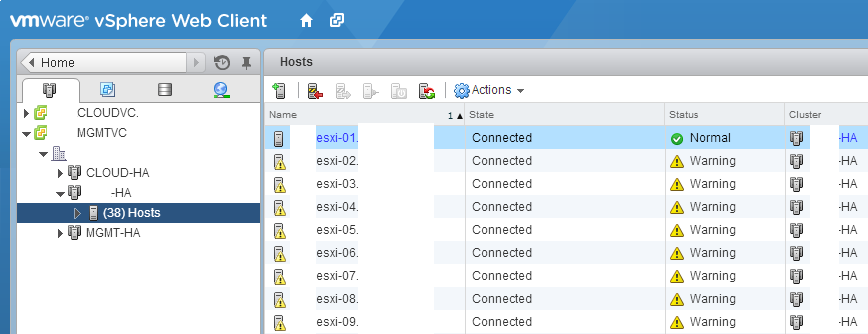
After a while, all of your hosts will show up in the cluster specified in the auto deploy rule configuration.
Just trying to put some tools together that will help me the next time a big deployment like this comes up. My Flexpod Toolkit is going to receive ALL of these snippets, and more. It’s of immensely greater value to run these tools inside the context of the data center solution as a whole - if a central automation toolkit can drive configurations based off of information already available in the infrastructure itself, then the value of the solution goes up exponentially.
I welcome any suggestions to anything I did here - I want to provide and improve upon these tools as a single unit as part of my Flexpod Toolkit project so that you can use them in your own environment.