Title here
Summary here
April 19, 2012 in Systems7 minutes
Snapmirror is a Netapp feature that’s pretty commonly used to copy data from one system to another. You can copy volumes, or qtrees. It’s also very useful in Disaster Recovery plans, since volumes can be incrementally backed up to an offsite location.
I have a VMWare vCenter instance running on Cisco UCS that utilizes a Fibre Channel LUN to store VM templates. It’s pretty large, since it holds templates for a variety of operating systems. I was tasked with getting these VMware templates to be accessible in a completely isolated system in another part of the datacenter. None of the physical infrastructure was shared, meaning I could not simply expose this LUN to another VMware host. Rather than recreate everything all over again from images in the secondary vCenter instance and store them on a brand new LUN on the secondary Netapp array, I decided to create a situation in which the data could be snap-mirrored to the secondary array.
The end result would be to have an identical volume created on the secondary filer so that I could access the LUNs and gain access to those templates from the secondary vCenter instance.
When considering a snapmirror, the first thing to do is identify the network connectivity for the transfer. The filers in question were in racks opposite each other, so a 25’ Cat6 cable was more than sufficient for this purpose. The e0a ports on the back of each filer were unused and provide 1Gbit network connectivity, so this is what I chose to use for the transfer.
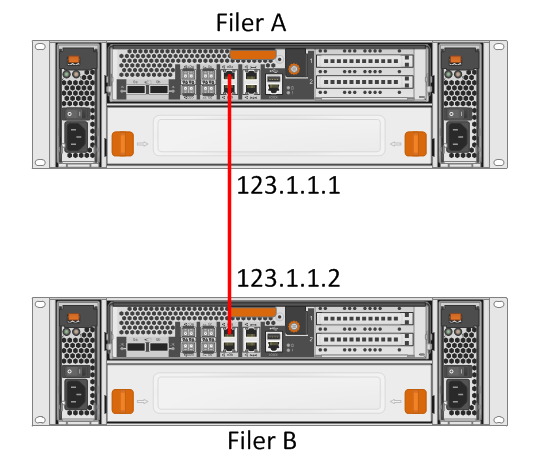
It looks like those ports are capable of autosensing that the cable being used was a straight-through cable (not a crossover) and was able to re-pin to make the connection work. The links lit up immediately.
The next thing to do is to configure the IP addresses on the interfaces being used for the copy:
FilerA> ifconfig e0a 123.1.1.1 netmask 255.255.255.0 up
FilerA> ifconfig e0a
 e0a: flags=0x2f4c867<UP,BROADCAST,RUNNING,MULTICAST,TCPCKSUM> mtu 1500
 inet 123.1.1.1 netmask 0xffffff00 broadcast 123.1.1.255
 ether 00:a0:92:4c:6b:12 (auto-1000t-fd-up) flowcontrol full
FilerA>
FilerB> ifconfig e0a 123.1.1.2 netmask 255.255.255.0 up
FilerB> ifconfig e0a
 e0a: flags=0x2f4c867<UP,BROADCAST,RUNNING,MULTICAST,TCPCKSUM> mtu 1500
 inet 123.1.1.2 netmask 0xffffff00 broadcast 123.1.1.255
 ether 00:a0:92:4c:6b:13 (auto-1000t-fd-up) flowcontrol full
FilerB>ping 123.1.1.1
 123.1.1.1 is alive
FilerB>
Now that network connectivity exists on my dedicated 1Gig link, I want to start thinking about transferring the volume of data. I already have a 50G test volume created that I intend to transfer:
FilerA> vol status snap_test_vol
 Volume State           Status            Options
 snap_test_vol online          raid_dp, flex     create_ucode=on
 Volume UUID: ca484e60-8b11-11e1-a8a1-0000000000
 Containing aggregate: 'SAS_600g'
FilerA>
On the destination filer, you need to create a volume that’s as big or bigger than the source volume. Be careful to account for true volume size - go a a little over if you need to.
FilerB> vol create snap_test_vol_dest SAS_600g 50g
 Creation of volume 'snap_test_vol_dest' with size 50g on containing aggregate
 'SAS_600g' has completed.
FilerB> vol status snap_test_vol_dest
 Volume State           Status            Options
 snap_test_vol_dest online          raid_dp, flex     create_ucode=on,
 convert_ucode=on
 Volume UUID: 4bab1a3c-8b12-11e1-b31b-000000000
 Containing aggregate: 'SAS_600g'
Now that the destination volume is created, we need to set it to “restrict” status. This prevents extraneous disk writes while the volume is being populated with data from the snapmirror. We will not be able to access the data on the volume while it is in this mode, but it is a protective measure that is a requirement for running a snapmirror.
FilerB> vol restrict snap_test_vol_dest
 Volume 'snap_test_vol_dest' is now restricted.
FilerB>
If you attempt the transfer now, it will be denied:
FilerB> snapmirror initialize -S 123.1.1.1:snap_test_vol -w snap_test_vol_dest
 Transfer aborted: cannot connect to source filer.
FilerB>
Though the connectivity exists, we need to set up the snapmirror relationship first. This is somewhat beyond the scope of this article, but we could initialize, performing a full initial data copy, but then keep the relationship up so that we could do incremental snapshot comparisons after the initial copy, which transfers the data that has changed since the last transfer to the backup filer. We’re only going to perform an initial data copy, so we won’t get into that detail right now. Regardless, the relationship needs to be set up.
First, the “snapmirror.conf” file needs to be edited on the destination filer:
FilerB> wrfile /etc/snapmirror.conf
 123.1.1.1:snap_test_vol 123.1.1.2:snap_test_vol_dest - - - - -

FilerB>
Then, you need to edit the “snapmirror.allow” file on both filers. I will first show you the incorrect way to do it (Spoiler alert, I did this the first time).
FilerA> wrfile /etc/snapmirror.allow
 123.1.1.2
FilerA>
FilerB> wrfile /etc/snapmirror.allow
 123.1.1.1
FilerB>
My background in data networking can claim responsibility for this one. I figured all the netapp filer needed was the source and destination IP addresses. Trying a transfer now will generate this:
FilerB> snapmirror initialize -S 123.1.1.1:snap_test_vol -w snap_test_vol_dest
 Transfer aborted: source specified does not match configuration file.
FilerB>
I fiddled with the configuration a little bit - I figured the snapmirror.allow file also needed the volume name:
FilerB> wrfile /etc/snapmirror.allow
123.1.1.1:snap_test_vol

FilerB>
That got me a different result:
FilerB> snapmirror initialize -S 123.1.1.1:snap_test_vol -w snap_test_vol_dest

Wed Apr 18 14:21:36 EDT [FilerB: replication.dst.err:error]:
SnapMirror: destination transfer from 123.1.1.1:snap_test_vol
to snap_test_vol_dest : transfer from source not possible;
snapmirror may be misconfigured, the source volume may be busy or unavailable.

Transfer aborted: transfer from source not possible; snapmirror
may be misconfigured, the source volume may be busy or unavailable.
If you look at the other filer at this point, you’ll see that it was actually actively denying the connection:
FilerA> Wed Apr 18 14:20:49 EDT [FilerA: snapmirror.src.requestDenied:error]:
SnapMirror transfer request from snap_test_vol to host FilerB at IP address
123.1.1.2 denied: not listed in /etc/snapmirror.allow.
This is a simple fix - all you need to do is add the actual hostname of the destination filer in the snapmirror.allow file of the source filer (I kept the IP address in there just in case - likely not needed):
FilerA> wrfile /etc/snapmirror.allow
 123.1.1.2
 FilerB

FilerA>
Finally, the transfer successfully gets kicked off:
FilerB> snapmirror initialize -S 123.1.1.1:snap_test_vol -w snap_test_vol_dest
 Transfer started.
 Monitor progress with 'snapmirror status' or the snapmirror log.
 Transfer successful.
FilerB>
If you look at the status of the snapmirror, you can see the relationship that is set up. If you run this command on the source filer, you can also see this relationship (as well as a progress indicator that tells you how much data has been transferred):
FilerB> snapmirror status
 Snapmirror is on.
 Source                   Destination                   State          Lag        Status
 123.1.1.1:snap_test_vol  FilerB:snap_test_vol_dest  Snapmirrored   00:01:01   Idle
FilerB>
FYI - having a dedicated link, even 1Gig - totally worth it. This was a test with very little data, but I was able to move a 500G volume in just a few minutes - the filer seemed to be capable of transferring data at near line-rate.
You can set up a snapmirror to use something like the management network, or even a production VIF, but I recommend setting bandwidth limitations on the relationship so you don’t disrupt important traffic. I didn’t want to deal with that, thus the dedicated connection.
Finally, in order to use the volume, you have to break the snapmirror relationship, then set the volume to “enable” status. If you try to do anything with it like create a LUN, you’ll get a message indicating the volume is read-only:

First, we break the snapmirror relationship. This is done by volume name. Keep in mind that you’ll need to add the relationship again for a resync, such as in a DR scenario. It informs you that the volume size will remain the same in case this is desired later:
FilerB> snapmirror break snap_test_vol_dest
 snapmirror break: Destination snap_test_vol_dest is now writable.
 Volume size is being retained for potential snapmirror resync.
 If you would like to grow the volume and do not expect to resync,
 set vol option fs_size_fixed to off.
FilerB>
Finally, you’ll remember that we set the volume to “restrict” in order to prevent writes while backing up. Setting the volume to “online” is simple enough:
FilerB> vol online snap_test_vol_dest
Volume 'snap_test_vol_dest' is now online.
FilerB>
That’s it! We now have a complete copy of the volume on the new filer, and we even have the ability to copy incremental data in the future. If we make changes to the images we’re using in vCenter, and the desire is to update the destination volume, we can add the relationship again, perform a resync, and only the updated information is transferred.
Pretty cool.